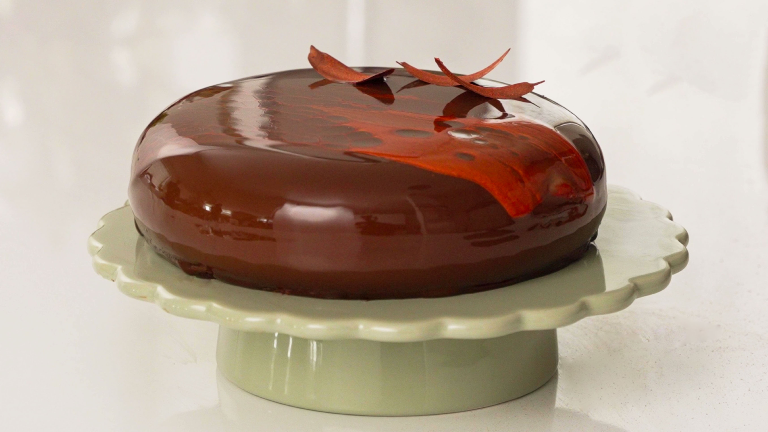
Do you want to impress your guests? Then try this beautiful chocolate cake with chocolate mousse and raspberries! The cake features a sponge with a subtle coffee flavour, topped with a hazelnut crunch, fresh raspberries, and a rich and intense chocolate mousse. The finishing touch is a glossy chocolate glaze that adds elegance to the cake. While it might not be the easiest cake to make, it's definitely worth the effort and will leave your guests impressed.
Mousse Cake with Chocolate Glaze
Ingredients
10pers
Coffee Bisquit Joconde - Cake sponge with a Hint of Coffee
36gButter
168gEgg white
200gSugar
288gEggs, , weight without shell
200gAlmond flour
40gSugar
2gFine salt
64gAll-purpose flour
3gCorn starch
2gCoffee, finely ground
Hazelnut Praline
25gWater
80gSugar
120gHazelnuts, , roasted
Hazelnut Crunch
65gMilk chocolate
40gHazelnut Praline, from the recipe above
40gCorn flakes, or feuilletine
Flaky sea salt, , a pinch
150gFresh raspberries
Chocolate Mousse with Patê a Bombe
4pcs.Leaf gelatin
68gEgg yolk
68gSugar
1tbsp.Water
141gWhole milk, 3.5 % fat
161gDark chocolate, , chopped or in pellets
322gHeavy cream 38%
Chocolate Glaze
3.5pcs.Leaf gelatin
100gGlucose syrup
100gWater
150gSugar
100gCondensed milk, , sweetened
150gDark chocolate
Mirrorglaze, , store-bought
Copper powder, , edible
Instructions
1
Coffee bisquit joconde - cake sponge with a hint of coffee
Preheat the oven to 190 ºC using conventional heat. Melt the butter in a saucepan at 50 ºC. At this temperature, the butter should melt gently without bubbling. In a bowl, combine 168 g of egg whites and 200 g of sugar, then whisk until stiff peaks form. In another bowl, combine the whole eggs, almond flour, and 40 g of sugar. Whisk until you have a thick and airy mixture. Then gently fold in the whipped egg whites. In a separate bowl, mix salt, flour, cornstarch, and coffee. Sift this dry mixture over the airy egg mixture, then gently fold the batter together. Finally, add the melted butter and fold it into the batter. Pour the batter into a deep baking pan lined with parchment paper or you can use a silicone mold. The pan's size should be around 35x42 cm. Bake the cake in the middle of the oven for approximately 10 minutes. Check for doneness by inserting a skewer or similar into the center of the cake. The skewer should come out clean. Allow the cake to cool, then cut out a circular cake layer with a diameter of 14 cm. Note: For the mousse cake, you only need one round cake layer with a diameter of 14 cm, so there will be cake leftover. You can cut out more cake layers and store them in the freezer for another cake, or use the cake scraps to make homemade cake pops.
2
Hazelnut praline
Place water, sugar, and hazelnuts in a saucepan. Set the temperature to 200 °C. Heat the mixture while stirring until the sugar and hazelnuts become golden, this takes about 5 minutes. Remove the saucepan from the heat and pour the caramelized hazelnuts onto a baking sheet lined with parchment paper. Spread them out evenly and allow to cool. Once the hazelnuts have cooled down, transfer them to a blender and blend until you have a smooth nut butter consistency. When you blend the hazelnuts they are chopped into such small pieces that the oil is released from them, resulting in a creamy sweet nut butter. This process takes some time. First the hazelnuts are blended to a powder, then into a thick paste, and finally into a thinner nut butter. You'll need to blend, scrape the sides, blend again, scrape, and so on until the mixture becomes smooth. It doesn't take too long, but it requires some patience and persistence. Note: The hazelnut praline is used for the hazelnut crunch, but you will have some leftover. You can use it as a spread on bread, on top of oatmeal, or in another cake or dessert.
3
Hazelnut crunch
Add chocolate and hazelnut praline to a saucepan and melt it at 50 ºC, stirring occasionally. Add cornflakes/feuilletine and a pinch of sea salt. Take your cake base and spread the hazelnut crunch over it. Smooth it out with a small spatula or the bottom of a glass. Place the raspberries in an even layer on the cake. Press the raspberries slightly into the hazelnut praline so they stay in place. Place the cake in the freezer for at least 1 hour.
4
Chocolate mousse with Patê a Bombe
Soak the gelatin leaves in cold water. Combine egg yolks, sugar, and water in a saucepan. Use the automatic program or set the temperature manually to 80 °C, but don't set the effect on the cooktop too high, set it to around 5-7 on the cooktops control panel. Stir the mixture gently for 5-6 minutes until it gets a thick and syrup-like consistency. Transfer the mixture to a stand mixer. Whisk until the mixture is light and fluffy. This is your patê a bombe. Heat the milk in a saucepan to 80 °C. Squeeze the excess water from the gelatin leaves and melt the gelatin in the warm milk. Remove the saucepan from the heat. Add the chocolate and stir until the chocolate is melted. Let it cool to about 30-35 ºC. You can transfer it to a bowl for faster cooling. Whip the heavy cream until it barely forms soft peaks, be careful not to whip it too much. Fold the egg mixture into the chocolate mixture. Fold in a bit of the whipped cream. Then add the rest and fold it in gently until well combined. Pour the mousse into your silicone mold (we used Silicone Mold Eclipse 1000, 180 mm diameter from Silikomart). Tap it lightly to ensure the mousse settles evenly in the mold. Don't fill the mold all the way up, remember to leave space for the cake base. Take your frozen cake base and lower it into the mousse, make sure to place it upside down so that the raspberries are submerged into the mousse. Place the cake in the freezer for at least 4 hours, preferably overnight. The cake is easiest to work with when fully frozen. If you have leftover mousse, you can pour it into small individual serving glasses.
5
Chocolate glaze
Soak the gelatin leaves in cold water for 5-10 minutes. Combine glucose syrup, water and sugar in a saucepan. Set it to 80 ºC, and stir until all the sugar is dissolved. Remove the saucepan from heat. Squeeze any excess water from the gelatin and add the gelatin to the saucepan, let it melt in the warm sugar mixture. Stir in the condensed milk. Place the chocolate in a tall container, pour the warm mixture over the chocolate. Blend with an immersion blender for 2-3 minutes. Don't start to blend until the immersion blender is fully immersed in the mixture and avoid lifting it up and down while blending. We want to prevent air bubbles from forming in the glaze. Cover the glaze with plastic wrap, ensuring it touches the surface of the glaze to prevent a skin from forming. Let the glaze cool down to 30-32 ºC, which takes about 45-60 minutes in the fridge, but check periodically. If your glaze becomes too cold, you can warm it in a saucepan set to 32 ºC. Add a few spoonfuls of store-bought mirror glaze to a saucepan and add a bit of edible copper powder. Heat the glaze to 70 ºC. Place a metal spatula in a glass of boiling water so it's warm, when you are ready to make the copper pattern. Remove the frozen cake from the silicone mold. If needed, trim any uneven parts using a small knife. Place the cake on a bowl turned upside down. You can place the bowl in a baking pan to catch any excess glaze. Use a thermometer to check if your glaze has reached 30-32 ºC. Gently stir the glaze to ensure an even temperature throughout. Pour the chocolate glaze over the cake, make sure it's fully covered. Quickly dip the warm metal spatula into the copper glaze and create a decorative pattern by swiftly dragging the spatula over the cake. This part should be done quickly before the chocolate glaze has a chance to set. Carefully trim any excess glaze from the bottom of the cake, using either a metal spatula or a small knife. Transfer the cake to a serving platter. If you wish you can decorate the cake with some chocolate decorations. Allow the cake to thaw in the refrigerator before serving, which takes about 3-4 hours.
No comments yet
Be the first to comment on this recipe!
Log in to write comments